


Flowers in Watercolor Pencil
draw and paint a colorful Bird of paradise

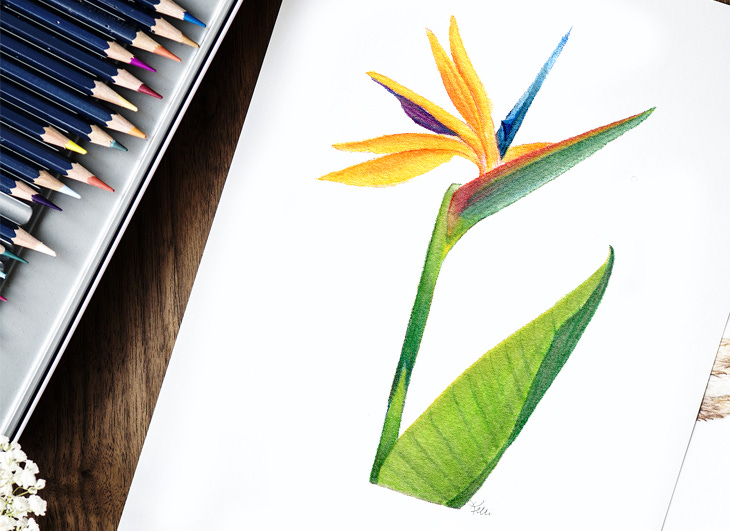
The beautiful Bird of paradise flower (Strelitzia) is the perfect subject to practice the watercolor pencil techniques from our last painting adventure.
A brief history
Bird of paradise flowers are also called Crane flowers because when the flower opens it resembles the head and beak of a colorful exotic bird. They symbolize joy, love, faithfulness, and thoughtfulness. They are closely related to the banana plant. The plants come in a variety of colors from yellow-orange and purple to a bright white.
Now that we know a little about our flower let’s get started!
Gather all your supplies — you will need:
Watercolor pencils - I used my Derwent Watercolour pencils; I have selected the ones that come in the set of 12 to show you don’t need a lot of colors to get started
Watercolor paper - I used cold-pressed 140 lb. paper
Watercolor brushes - I used a number 6 and 1 round (medium and small sized)
Container of water
Paper towels
Graphite pencil and eraser
Pencil sharpener
Photo of a Bird of paradise (free references to get you started)
Optional - artist tape
Step-by-step to painting your flower
I recommend reading through all the steps first so you become familiar with the process.Sketch then add dry color to dry paper
Sketch your flower lightly in graphite on your watercolor paper.
Once you have a drawing you like, use the eraser to lighten the lines. Having too much graphite on the paper will cause it to become trapped under the watercolor pencil and muddy the color.
Start adding dry color to the paper, being careful to leave any white areas free of color. I am not concerned with shadows and adding dimension at this stage. I just want to establish the local color.
Think of local color as the main color of an object without shadows or highlights (e.g. the grass is green, or the sky is blue).

Dissolve the color with water
Before wetting the paper, I put piece of artist tape along the bottom edge of the composition so I’d get a sharp straight edge when the painting was finished. This is entirely optional and if you do the same, I strongly advise you test your tape on a small corner of your watercolor paper first. Not all tapes lift cleanly. I have ruined paintings by skipping this step, please don't repeat my mistake.
Wet your medium brush with clean water and begin dissolving the colors. For areas that are close to one another skip around so colors don't bleed together. I wet every other petal and then I went back to the ones I had skipped. I did the same for the stem and leaves.
Let everything dry.
As you can see from the photo below, just using the colors that came in my set resulted in very bright green leaves. If this happens to you, don’t panic, the colors can be adjusted.
To tone-down the dominant yellow-green, I took a scrap piece of watercolor paper and made circles of color. I used a wet brush to mix the colors together.
Possible color mixes: Add brown to green to get an olive-green. Mix blue and black to get dark gray.

When you add these colors use a damp brush to add a light layer of color, this is called glazing. By using a damp brush, you don't disturb the color underneath.

Adding details
I picked up color directly from the pencil tip and brushed it over the flower petals in order to darken the shadows and give them a bit more realism.
Once all the layers were dry, I sharpened my pencils to a really fine point (see below) and added some broken lines along the edges to sharpen them up. I didn't make a solid outline; I used short closely placed lines. If you used yellow or light orange on the petals, you may want to add a few lines to the tips of the petals to make sure they stand out from the white paper.
When you dissolve the pencil lines, the edges can get a bit fuzzy and while that is fine for most areas, the edges of petals and leaves can benefit from a bit of sharpening up. I used dark red (for the yellow/orange petals) and purple everywhere else (even the leaves). Purple works great with green because they are opposite to each other on the color wheel so they balance each other. If you don't have purple use your darkest blue.This next step is optional but I find it to be the most beneficial. I walk away from my painting. This is the time to have a cup of tea or go for a walk; then when you return you’ll be better able to see if the painting needs anything.
Once you have made any additional adjustments sign your painting and enjoy it!


Next steps
Keep practicing and experimenting with your watercolor pencils. Try using these techniques with other flowers. Let me know how it goes by leaving a comment or post a question if you need any help.
Until next time…Happy Painting!
Kelli ♥
If you find the information in this site helpful, please consider sharing the content with a friend.
If you’d like to support my work, please visit my Etsy shop where you can buy a little something for you or a friend.
Thank you!